How to Organise a Breast Milk Stash: My Fridge, Fridge-Freezer and Chest Freezer System
One of the benefits of exclusive pumping is that you can sometimes express more milk than your baby needs in a day. Over time, that extra milk can become a freezer stash.
And that stash can be incredibly useful.
It can give you more freedom to leave the house without worrying about how someone else will feed your baby. It can help you end your pumping journey before your baby finishes having breast milk. It can also give you a bit of breathing space on the days when pumping feels like too much.
But, when you’re exclusively pumping, frozen breast milk can build up fast.
At first, your newly built stash feels manageable. A few frozen bags here and there. You know roughly what’s in there, roughly when it was pumped, roughly how long it’ll last.
Then one day you open the freezer and realise you have no idea what’s in there anymore. Bags are stacked on top of bags, some labelled, some frozen upright instead of flat. Suddenly, you’re digging through frozen breast milk trying to find the oldest bag, wondering what needs using first, and worrying that something will get forgotten at the bottom.
I know how frustrating it feels. I’ve been there. I spent hours looking for an organisation system that would actually stick – one that minimised waste, stopped me losing bags to the depths of the freezer, and gave me my sanity back.
Here’s the three-tier setup that worked for me, and the labelling method that made it actually stick.
Why Winging It Eventually Stops Working
In the early weeks, you can usually get away with a rough system.
You’re pumping eight or ten times a day, the volumes are small, and there isn’t much to manage.
But if you’re pumping for months, and many exclusive pumpers are, the stash can slowly start to feel overwhelming.
Breast milk has a limited freezer life. Storage guidance varies, but frozen breast milk is usually best used within around six months, though some guidance allows up to twelve months in a freezer kept at a consistent temperature.
A quick note: Storage guidance can vary slightly between organisations, so always follow the most relevant local guidance for your situation, especially if your baby is premature, unwell, or immunocompromised.
If you’re not rotating your stash, older milk can end up expiring at the back while you keep using newer milk from the front.
After all those pump sessions, that’s not a waste you want to make.
A simple system also helps on the bad days. When you’re tired, overwhelmed, running late, or someone else is feeding your baby, you don’t want to stand there wondering which bag to use next.
You want the answer to be obvious:
Use the oldest milk first.
The One Rule That Makes the Whole System Work: FIFO
FIFO – first in, first out – means the oldest milk always gets used first. New milk goes to the back of the queue; old milk comes from the front.
Everything in this system is designed to make FIFO effortless. Once it’s running, you shouldn’t have to think about it much.
The Three-Tier System: Fridge → Fridge-Freezer → Chest Freezer
The basic idea is that milk flows in one direction, from newest to oldest, across three storage zones.
Each tier has a different job.
Tier 1: The fridge
Freshly pumped milk goes straight into the fridge.
If you’re building your stash, this is what you’ll feed your baby today. If you’re already rotating frozen milk, then fresh milk can work as an emergency top-up alongside thawed milk.
This is also where the pitcher method can come in.
The pitcher method is when you store all breast milk pumped over a 24-hour period in one sealed, food-grade container, which can make bottle prep easier.
I personally never had enough fridge space for a pitcher, and it felt like an extra step. Instead, I left milk in Medela bottles and added little stickers with the date written on them. Then, usually the next day, I poured the milk from the day before into bags ready to be frozen.
Tier 2: The fridge-freezer
If you’re just starting to build your stash, or you’re not planning to pump for long, your fridge-freezer might be where you keep all your frozen milk for now.
It’s easy to access, and it’s useful for shorter-term storage. It’s also the best place to freeze milk bags flat before moving them somewhere else.
Freezing breast milk flat makes a huge difference. The bags take up less space, stack more easily, and are much easier to organise later.
Once the milk is frozen solid, you can either keep it in the fridge-freezer if that’s your main storage space, or move it into a chest freezer for longer-term storage.
Tier 3: The chest freezer
The long-term stash, and a real game changer, especially if you overproduce, want to feed breast milk for longer than you want to pump, or simply want your fridge-freezer back.
A chest freezer usually holds a lower, more consistent temperature than a fridge-freezer, which makes it better suited to longer-term storage. UK guidance usually recommends using frozen breast milk within six months at -18°C or lower, while some guidance allows up to twelve months in consistently frozen conditions.
If you’re storing milk long term, it’s worth checking that your freezer is actually reaching -18°C or lower.
This is also where organisation matters most, because it’s easy to throw bags in but retrieving them in the right order is another story.
The key is keeping milk moving: oldest milk from the chest freezer comes up to the fridge first, while fresh surplus moves down to the chest freezer at the back of the queue.
Overproducer tip: If you’re consistently producing significantly more than your baby needs, you may find you barely use the fridge-freezer as a storage stage at all – freezing flat there and then moving bags straight to the chest freezer the same day. That’s fine. The tiers are a guide, not a rule.
How Often to Move Milk Between Tiers
This does not need to be a daily task for everyone. If you’re producing a lot of extra milk, you might move bags daily. If your stash grows more slowly, a few times a week may be enough.
Pump → fridge
Freshly pumped milk goes into the fridge after each pumping session. Store it towards the back of the fridge, not in the door, where the temperature changes more often. Use clearly labelled bottles, bags, or containers so you know when the milk was expressed.
As I mentioned earlier, I didn’t use the pitcher method. I kept the milk in bottles, labelled them with the date, and bagged the previous day’s milk the next morning.
That kept things simple enough for me to actually maintain.
Fridge → fridge-freezer
Freeze milk you’re not planning to use within four days.
I wouldn’t wait until it’s right at the limit. If you can already see you won’t use it, freeze it the same day or the next morning.
Lay the bags flat while they freeze. This saves space and makes them much easier to stack, sort, and move later.
Fridge-freezer → chest freezer
Once the bags are frozen solid, move them into the chest freezer.
I usually did this daily when I wanted to freeze another batch.
Freezer → fridge
Move the milk you need into the fridge the night before, so it has time to thaw safely.
Quick-reference flow:
Pump → fridge → freeze flat in fridge-freezer → move to chest freezer → pull oldest to fridge to thaw → use from fridge
It feels like a lot when you write it all out, but you get used to it quickly. After a week or two it runs on auto-pilot.
How to Label Breast Milk Bags
Labelling is faster than you’d think and doing it before you fill the bag makes it much easier.
All you need is a non-toxic permanent marker. I used Sharpie. Some people prefer sticky labels or pre-printed stickers, which work just as well.
Here’s what I wrote on every bag:
- Date pumped – day and month, always, for example 14 Mar
- Volume – in ml or oz, whichever you use
I always used the same brand of bags and followed their volume markings, although they were not always accurate. I also found it easier to freeze milk in realistic feed-sized portions rather than huge bags. Smaller portions thaw faster and reduce the chance of wasting milk if your baby doesn’t need as much as you expected.
Some people like to add a sequence number to each bag, but that felt like too much for me.
Instead, I labelled each bag with the date, froze it flat, and then organised the bags properly once the freezer started getting messy.
Keeping the Chest Freezer Organised
Inside the fridge-freezer, keeping FIFO intact is straightforward: oldest bags at the front or on top, newest at the back or underneath.
The chest freezer is trickier, because bags can get shuffled and lose their order easily. A few approaches work well:
Baskets or bins
Labelled baskets or bins divide the chest freezer into zones – one for “use next,” one for longer-term storage – making it easy to keep order without restacking every time you open the lid. Numbering bags helps here too: even if bags get shuffled, the lowest number is always the oldest.
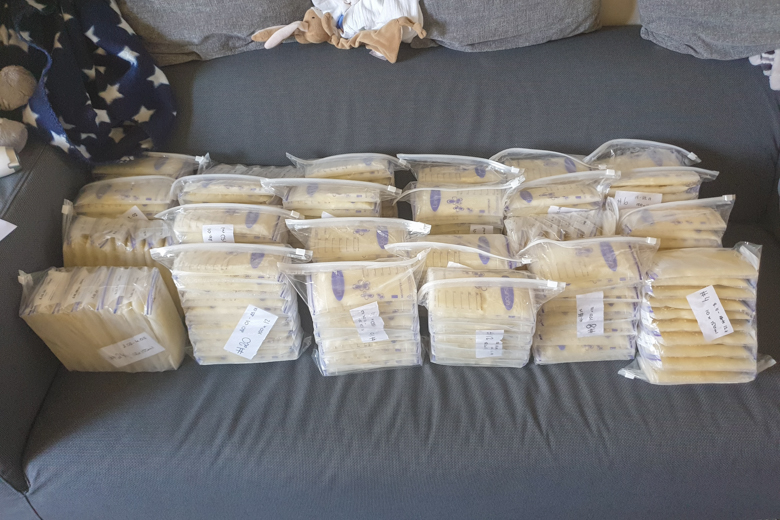
The brick method
The brick method is what I used, and it’s the most robust system I found. Every so often, I’d pull all the bags out of the chest freezer, sort them by date, and pack them into gallon-sized zip bags.
Each “brick” was labelled with a sequence number and the date range of the milk inside. The bricks then go back into the chest freezer with the oldest on top.
It sounds like more work than it is. Once the bricks are in place, retrieving milk is simple: just grab from the top. And when I decided to donate, having everything pre-sorted by date made that process much easier too.
My Stash Is a Mess. Where Do I Even Start?
Life happens. If you end up with a freezer full of milk bags and no clear system, don’t panic. You can fix it.
Do a full inventory
Take everything out (work quickly, or do it in batches to keep the temperature stable). Lay the bags out and sort by date.
Set aside anything unlabelled.
Triage
Check every date against safe storage timelines: three to six months for a fridge-freezer, up to twelve for a chest freezer. Anything clearly beyond the guidance is where you need to use your judgement, but I wouldn’t rely on smell alone.
Thawed milk can sometimes smell soapy because of lipase, and that doesn’t always mean it has gone off. But if milk smells clearly sour, rancid, or unpleasant, or if you’re genuinely unsure how long it has been stored, I would rather discard it than spend weeks worrying every time I open the freezer.
For unlabelled bags: if you forgot to label them recently, you could use a rough date range from the last labelled batch to today and use those bags as soon as possible.
If the bags may be much older, use your judgement and follow safety guidance. Personally, I would rather discard milk if there was a real chance it had been stored too long.
It’s painful to waste milk, but spending weeks feeling unsure every time you open the freezer is worse.
Can you refreeze thawed milk?
This is worth keeping in mind when you’re deciding how much to pull from the chest freezer at a time.
Restart your system from here
If you want to number bags, start a new sequence. If you only want to use dates, commit to dating every bag from now on.
Set a weekly reset habit
Five minutes, once a week: check whether anything needs migrating between fridge and freezers, confirm this week’s bags are labelled, and make sure nothing has ended up where it shouldn’t be. This one habit is what keeps your stash from becoming messy again.
Final words
A breast milk freezer stash is meant to help you, not become another thing you have to mentally manage all day.
The best system is the one you can keep using when you’re tired, busy, overstimulated, or doing everything one-handed with a baby nearby.
For me, that was a simple three-tier setup: fridge, fridge-freezer, chest freezer.
Fresh milk went in. Oldest milk came out. Everything was labelled by date. And when the stash grew, I used the brick method to keep it under control.
Once the system was in place, I stopped thinking about milk storage all the time.
And honestly, that’s exactly where you want to be.
Source:
- https://www.nhs.uk/best-start-in-life/baby/feeding-your-baby/breastfeeding/expressing-your-breast-milk/storing-breast-milk/
- https://laleche.org.uk/expressing-your-milk/#storing-milk
- https://www.breastfeedingnetwork.org.uk/breastfeeding-information/continuing-the-breastfeeding-journey/expressing-and-storing-breastmilk/
- https://llli.org/breastfeeding-info/storing-human-milk/
- https://cdn.who.int/media/docs/default-source/mca-documents/nbh/enc-course/revised-resources/supplemental-materials/breast-milk-feeding-alternative-methods/handout-hand-expression-and-safe-storage.pdf?sfvrsn=8b1761cd_1
- https://www.cdc.gov/breastfeeding/breast-milk-preparation-and-storage/handling-breastmilk.html
- https://infantrisk.com/content/what-pitcher-method-storing-breastmilk